How to Arrange Fiber Optic Patch Panel in Data Center
In modern data centers, where high-speed and high-density connectivity is critical, organizing fiber optic patch panels effectively is essential for performance, scalability, and maintenance.
Here’s a step-by-step guide to help you properly arrange fiber optic patch panels in a data center environment.
Plan the Layout in Advance
Before installation, assess your network’s current and future needs:
- Number of fibers per cabinet or rack
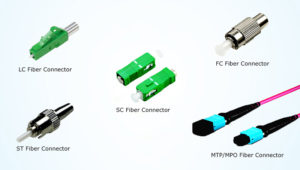
- Type of connectors (LC, SC, MPO, etc.)
- Expected growth (10G, 40G, 100G, or 400G transitions)
Use this information to select the appropriate patch panel type—rack-mounted, wall-mounted, or modular high-density ODF systems.
Use Structured Cabling Standards
Follow TIA-942 or ISO/IEC 11801 standards for structured cabling. Use centralized patch panels to simplify:
- Inter-rack connectivity
- Equipment cabling
- Cross-connect configurations
- This improves manageability and minimizes MAC (Moves, Adds, and Changes) time.
Label Everything Clearly
Label each port, panel, and trunk cable with unique IDs. Use:
- Pre-printed labels
- Color-coded adapters or boots
- QR codes or digital mapping (optional in smart DCs)
- Good labeling is crucial for troubleshooting and documentation.
Manage Cables Neatly

Use fiber management accessories:
- Cable managers (horizontal/vertical)
- Slack storage spools
- Velcro ties (avoid zip ties that can damage fibers)
Always maintain minimum bend radius to protect fiber integrity and avoid signal loss.
Separate by Type and Function
Physically separate patch panels by:
- Application (LAN, SAN, internet uplink, etc.)
- Fiber type (single-mode vs. multimode)
- Speed class (10G, 40G, 100G)
This improves troubleshooting efficiency and reduces the risk of incorrect connections.
Leave Room for Expansion

Choose panels that support modular cassettes or blank slots. Reserve space and ports for future scaling. Consider sliding or swing-out panels for easier access.
Test and Document
After installation:
- Run optical loss tests (OLTS)
- Inspect connectors (using fiber scope)
- Record link maps and test results
Store documentation digitally for ongoing maintenance
More information please review our website Tarluz
FiberGuide: Navigating the Future of Optical Connectivity
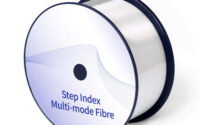
Step-Index vs Graded-Index Fiber: A Fundamental Guide to Specialty Optical Fibers